The thing that stops most people posting consistently is not the idea or the editing. It is that filming requires moving a table, finding the tripod, clearing a background and closing the curtains, so a twenty-minute job becomes ninety and gets postponed.
A home studio solves that. Not a room, a corner that stays ready.
Choosing the corner
Walk around your home at the time of day you would normally film and look for these, in order of importance.
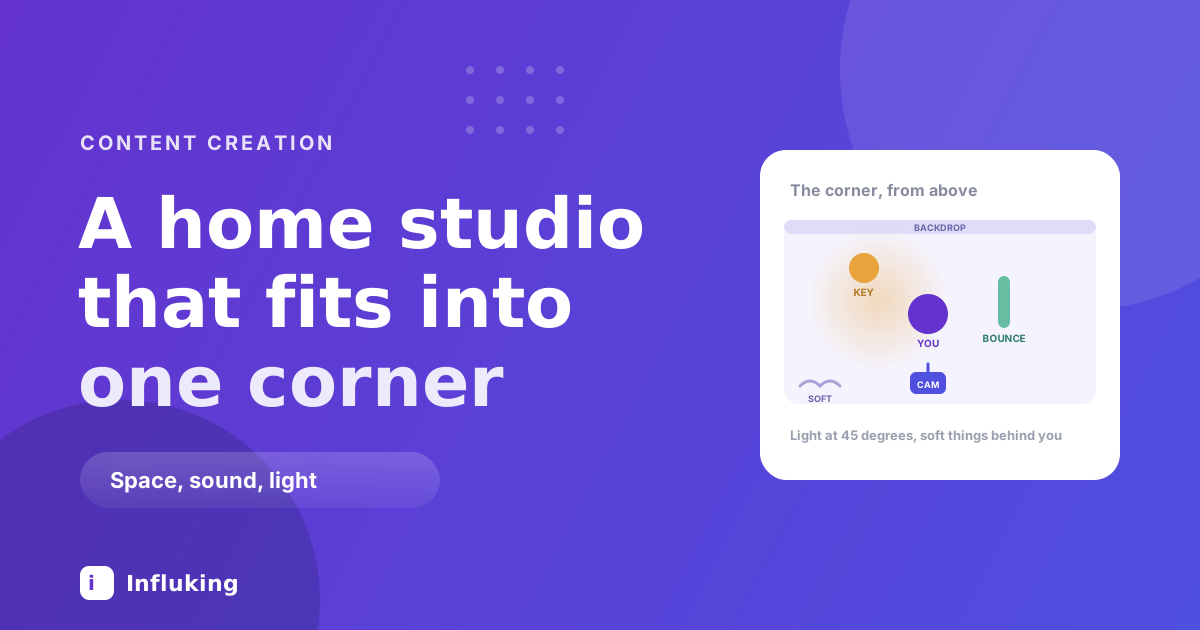
- A window to one side. Not behind you, which silhouettes you, and not directly in front, which flattens everything. To the side at roughly 45 degrees is what you want.
- Soft things nearby. Curtains, a bed, a sofa, a wardrobe. These absorb sound, and echo is the audio problem that cannot be fixed afterwards.
- A background with some depth. A corner where you can stand a metre or two from the wall beats being pressed against it.
- Space you can leave alone. The corner nobody walks through, so the setup survives between shoots.
- A power socket. Boring, and it decides where the light can go.
A bedroom corner beats a living room almost every time, because bedrooms are full of soft furnishings and living rooms are full of hard surfaces.
Sound is the first thing to fix
Most people start with a light. Sound is the thing viewers abandon a video over, and in a home the fix is furniture rather than equipment.
Clap once in your chosen corner and listen. A sharp ring means hard reflective surfaces, so add soft mass: hang a blanket or curtain on the nearest bare wall, put a rug down, keep the wardrobe door open while filming. A room that sounds dead when you clap will sound good on camera.
Avoid the kitchen and the bathroom entirely for talking content, and turn off the fan, the air conditioner and anything with a compressor before recording. Microphone choice comes after all of this, and the microphone guide covers what to buy once the room is sorted.
The background
The background is doing more work than people credit, because it is on screen for the entire video and it is what makes content look considered or accidental.
- Keep it simple and slightly deep. Standing away from the wall creates separation and lets the background fall softly out of focus.
- Add two or three deliberate objects. A plant, a shelf, one lamp. Enough to look like somewhere, not enough to compete.
- Remove anything with text. Book spines and posters pull the eye and get read instead of you being watched.
- Check the top corners. Ceiling lines, plug sockets and door frames are what makes a shot look like a video call.
- Keep it consistent. The same background across posts is a quiet part of a personal brand, and it makes a grid cohere.
A plain wall works and is boring. A wall with one plant and a warm lamp reads as intentional. That is the whole difference.
Light, placed rather than bought
Placement beats spending. One light at 45 degrees to one side of your face and slightly above eye level does most of the work, with something white on the opposite side to bounce a little back and soften the shadow.
Daylight from a side window is free and excellent, with the caveat that it changes through the day and disappears in the evening, which is why a single light is worth owning if you film after work. The builds and prices are in the lighting setup guide, so this post will not repeat them.
One thing to avoid: the ceiling light. Overhead light puts shadows under eyes and noses, and mixing it with window light gives you two colour temperatures that fight each other, which then has to be fixed in grading.
Camera position
Get the phone on a tripod at eye level or very slightly above. Below eye level is unflattering and reads as accidental.
Distance depends on the shot, but around an arm and a half away for a talking head is a reasonable default. Closer feels intense, further makes you small in frame and makes audio worse.
Mark the tripod position on the floor with tape. This sounds excessive and it is the single thing that makes a setup repeatable, because next week you place the tripod on the mark and everything already matches.
Leave it standing
This is the actual point of a home studio. A setup you assemble each time is a setup you will stop using.
- Leave the tripod up if you can, or store it within reach of the corner.
- Keep the light on its stand rather than packing it away.
- Keep a small box in the corner with the microphone, the cable and the wind cover, so nothing gets hunted for.
- Note your settings once and keep them written down, per the camera settings guide.
- Mark the floor for both the tripod and where you stand.
When filming takes five minutes to start, posting four times a week becomes plausible. When it takes an hour, it does not, regardless of motivation.
A sensible order to spend in
- Free. Choose the corner, add soft furnishings, clear the background, mark the floor, film beside a window.
- Around ₹500. A phone tripod. The first thing worth buying, because it makes everything else repeatable.
- Around ₹1,000. A wired lavalier microphone.
- Around ₹2,000 to ₹3,000. One light with a stand, so you are not dependent on daylight.
- Later. A second light for the background, a better microphone, a backdrop.
Under ₹5,000 total gets you a corner that produces genuinely good-looking video. Past that, spending buys convenience rather than quality, and quality comes from placement.
Mistakes worth avoiding
- Window behind you. Silhouette. The most common home filming mistake.
- Ceiling light on. Shadows under the eyes and mixed colour temperature.
- Backed against a wall. Flat, and your shadow lands on the wall behind you.
- Filming in a bathroom or kitchen. The echo cannot be fixed later.
- Packing everything away. The reason the studio stops being used.
- Buying a backdrop first. A tripod and a microphone change your output more.
Nobody follows an account for its production quality, but poor production is a reason to leave before the first sentence lands. A corner that stays ready removes the friction that quietly decides whether you post at all.